![]()
Anyone who has an exchange mailbox should be able to access Public folders, but Administrator status is required in order to create and manage public folders. See Managing Public Folders in Exchange.
In Exchange, when you have Administrator status, you can create new public folders within your top-level public folder. These can also be referred to as "subfolders", allowing you to organize material within your top-level folder.
|
|
Anyone who has an exchange mailbox should be able to access Public folders, but Administrator status is required in order to create and manage public folders. See Managing Public Folders in Exchange. |
In our example, we're going to open the top-level public folder and create a new folder within it.
|
1 |
In the Folder List on the left navigation pane, open Public Folders and then All Public Folders by clicking on the (+) plus sign. Select the Public Folder for your Exchange account. Ex. hwchi.com Note: You can not create folders at the All Public Folders level. You can only create new folders within your top-level folder (ex: hwchi.com)
|
|
2 |
Go toFile --> New
|
|
3 |
Select Folder in the next menu that opens up.
|
|
4 |
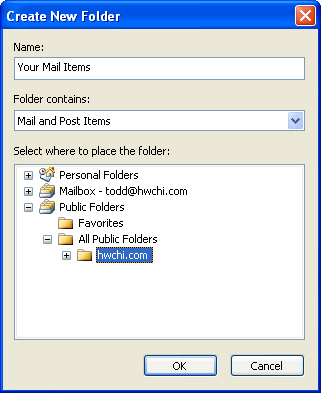
Enter a the name for the new folder. (Ex: Your Mail Items)
|
|
5 |
Next, you need to select the items that the folder contains. A public folder can contain a variety of items, and you need to specify which kind of item can be placed there when you create the folder. (ex: In the "Folder contains:" drop-down menu, select the Mail and Post Items option.)
|
|
6 |
Click Ok. |
|
7 |
Your new folder (Your Mail Items) appears in the All Public Folders section, within your top-level folder (ex: hwchi.com. (Note: you may need to click on the plus sign to the left of the folder icon in order to expand your public folder so you can see the folders inside it.)
|